As a classic car restoration specialist, and genuine car lover, some of the most rewarding projects which I have undertaken have been in the area of Porsche restoration. Restoring Porsches from the ‘70s and ‘80s is interesting enough, but my personal favorites are the Porsche 356 models. The Porsche 356 was manufactured from 1948 until 1965. Regardless of model, or suffix, a Porsche 356 restoration will yield a solid sports car with classic lines and timeless features that have bridged the gap from one generation to the other.
Here is a detailed Porsche restoration guide, using my personal notes from two separate and very different projects. Both are Porsche 356 models, one from the beginning of the era, and the other from the end.
1955 Porsche 356 (pre A) Continental 546/2 1500cc Restoration Guide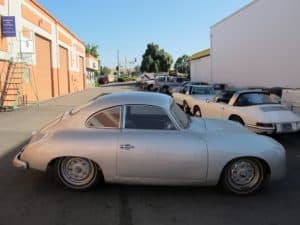
Beauty truly is in the eye of the beholder and when I behold a classic Porsche there are certain aspects that determine how beautiful it appears. They often differ from the socially accepted standard. Faded paint, dust, and flat tires can be totally overlooked, if I can find these other characteristics in tact. In the case of this 356, she met the criteria. Despite an obviously neglected condition, she was a thing of beauty.
 One of the key ingredients in any Porsche restoration is to begin with a complete car. Exterior trim, bumpers, body panels, hub-caps/trim rings, headlights/trim, tail light lenses/trim as well as glass and moldings should be intact or at least with the car. Under the bonnet, all brackets, shrouds, fuel delivery components, and engine/transmission components should be present and accounted for. The interior must be complete. Door and window crank handles, lock-knobs, and window soffits will be challenging to obtain separately and should be with the car, for a successful restoration. Instrument panel components, dash components, and glove box components should be intact. Regardless of condition, if your Porsche restoration begins with a complete car, then it is much more likely to turn out successful, in the end.
Mechanical
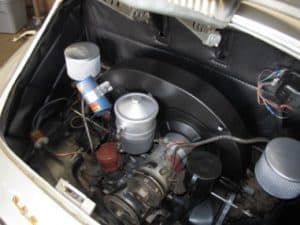
In the rear, under the bonnet, the engine was complete in this old girl. She had many miles on her clock, and was weary, but this could be rectified. The engine was dropped out 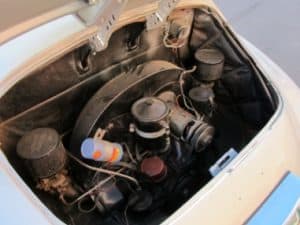 of the bottom and rebuilt. The block and “jugs” were disassembled and pistons, rods, and cylinder walls were carefully inspected. The engine components were then placed in a high-temp vat, which resembles a huge, high-pressure, washing machine with extremely hot solvent blasting the components clean. Remaining grime and residue was removed using a bead blaster, and the engine was reassembled using new rings, bearings, seals, and gaskets. The cylinder heads were reworked with new valve seals and guides and the seats were reground. The heads were reinstalled and valves were adjusted according to factory specifications. It was then repainted to maintain a “showroom” appearance. A new clutch, pressure plate, and throw-out bearing were installed and the engine was reinserted. Engine wiring connectors were carefully inspected and replaced as needed; wiring harnesses were retaped and rerouted wherever necessary. Accessory belts, fluids, and filters were replaced; as were maintenance tune-up items such as: spark plugs, distributor cap, rotor button, and air filters. The fuel tank was drained and inspected for the presence of rust and/or debris, inside. The twin Weber carburetors were rebuilt, using new floats and needle valves as well as gaskets, and reset to factory specifications. Fuel was put in the tank and the engine was started. It was allowed to reach normal operating temperature, and a final valve lash adjustment was undertaken.
 The standard transmission was drained and refilled with quality gear-lube and inspected for leaks. The axle boots were replaced, on both axles and the clutch was adjusted to achieve a proper release.
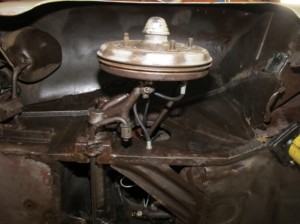
All steel brake lines, and high pressure flex hoses, were inspected and replaced as necessary. Cracks in the exterior housing of flex hoses warrants replacement, the presence of “rust bubbles” on steel brake lines also warns of inherent danger. The brake fluid was removed from the master cylinder and new fluid was flushed through the four-wheel-drum braking system. All four drums were removed and brake linings, wheel-cylinders, hardware, and backing plates were inspected. The brake shoes on this car were badly worn and/or cracked, and required replacement. Careful inspection of the wheel cylinders revealed that the bores were rusty, and would require replacement, as well. After the brake shoes were removed, I noticed the presence of several worn spots on some of the backing plates. These are normally the result of repetitious brake shoe movement, but may be problematic if left unattended. By using a small angle air grinder, and an abrasive pad, I ground the notched areas down. After grinding all rust and paint from the brake shoe guides, using a mig welder, I welded new metal into the most pronounced cavities and ground the new material into uniformity with the factory surface. I then applied a generous portion of the proper lubricant to the backing plate, so that the new brake shoe/s would operate smoothly and provide many more years of reliable service. I then installed the new wheel cylinders, “built” the brakes, using new hardware, and machined the drums. I repacked the inner and outer bearings on all four corners and replaced all four grease seals. I reinstalled the drums, tightening the castle-nut, and installing a new cotter pin to lock it in place. I then adjusted and bled the brakes according to factory specifications. Once the brakes were relined and bled, all four brake drums were thoroughly cleaned using a pressure washer, and allowed to dry overnight. I the morning, several coats of high-temp dull aluminum metallic spray paint were applied to the brake drums. The wheels were bead blasted, to remove debris and rust, then repainted using high-temp dull aluminum metallic spray paint. New tires were then mounted, balanced, and installed on the Porsche.
Steering and suspension components should certainly be an area of careful consideration, on any vehicle, but when working with a sports car they must be paid even greater attention. First, any suspension or steering component which demonstrates excessive movement determined to be greater than factory specifications is unsafe and must be replaced. Here is a quick method of testing this:
Raise the front wheels off the ground and support vehicle safely.
– Basic Suspension Check
Firmly grasp the front tire with your right hand in the twelve-o’clock position and your left hand in the six-o’clock position. Now, attempt to push in, towards the center of the vehicle, with one hand and out, away from the center of the vehicle, with the other hand. If movement is felt, the cause should be investigated. Simply observe the steering/suspension components while performing the check to see what parts are faulty.
– Basic Steering Check
Now, firmly grasp the tire by placing your right hand in the three-o’clock position and your left hand in the nine-o’clock position. Intensely move the tire/wheel back and forth, feeling and looking for excessive movement. Moving the right front tire, must result in a comparable movement of the left front tire and vice-versa.
 In addition to these basic tests, a visual inspection of all rubber suspension components should be performed. Any cracked, broken, or missing rubber jounce bumpers, sway-bar frame bushings, or dust cover boots should be replaced. Ball joints, and steering components, with ruptured or missing dust boots should be considered faulty. If the car “lists” to one side, coil spring, and/or shock, replacement may be necessary. Any shock with a cracked or missing rubber grommet should be considered faulty. The presence of hydraulic oil on shocks and struts is an indication of a leaking, and faulty component. A quality restoration will typically include a suspension and steering overhaul, with new coil springs and shocks. However, certain situations will dictate that only components which are obviously unsafe may be replaced; remember all suspension/steering components should be replaced in pairs and use extreme caution when working with pressurized components. Safety measures should always be of foremost importance. On this Porsche, steering and suspension components were good-to-go, with very little need of repairs. The rubber sway bar frame bushings and outer tie-rod-ends were replaced. Note: When replacing tie-rod-ends, loosen the retaining bolts/nuts and count the number of revolutions required to “unscrew” the end from the drag-link. When installing the new end, “screw” it in the same number of revolutions. I do not own an alignment apparatus, therefore the car must be driven off-site for wheel alignment; this procedure will keep the vehicle safely drivable. A front end or four-wheel wheel alignment should be performed after any steering or suspension repairs. Always set tire air pressure to manufacturer’s specifications before performing any wheel alignment procedure. In the case of this Porsche, I carried the factory alignment specifications along to the alignment center. Most modern alignment apparatuses are computerized, and equipped with a vehicle specification data base. These data bases seldom reach all the way back to 1955. Once the alignment is completed, make certain that the car doesn’t pull, or veer, with light pressure on the steering wheel. I also insist that the steering wheel be centered, but as a word of warning, I have been categorized as a “difficult” customer; not really, just a picky one.
 The Interior
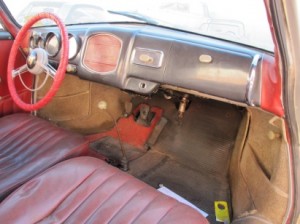
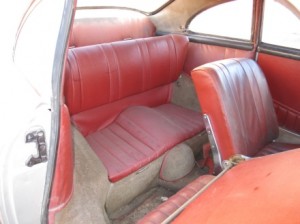
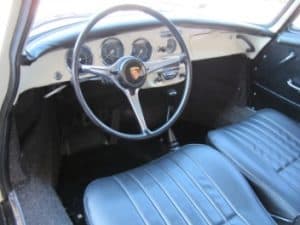
I mentioned that the interior on this 356 was intact; it was also in pretty decent condition. The door panels, floor mats, and rear seating were in excellent condition and required only a thorough cleaning. The front seating was in slightly worse shape. If money were no object, then I would have chosen to have new seat covers custom sewn and padding fitted for the front seats. Reupholstering the front seating, however, would require that the rear-seating and door panels be reupholstered, as well. Matching the color of the nearly sixty-year-old rear seating and door panels, with new leather would be virtually impossible. Complete carpet kits are available for these cars, but again, they are very expensive, and since you see very little of the actual carpet with the rubber floor mats in place, it is difficult to justify the expense. Possibly, at a later date, the new owner will choose to replace these items in order to achieve that showroom appearance. The “ultra-tacky” (so called because of its feel, not because of its look) leather steering wheel grip was removed in favor of the classic original look. After removing the cover, a small amount of degreaser mixed with warm water helped to remove the sticky film on this beautiful piece. The same was true of the classic analog VDO instrumentation.
A word of caution to all of you vintage car enthusiasts, be very particular when cleaning components which are made from plastic, such as the coating on this vintage steering 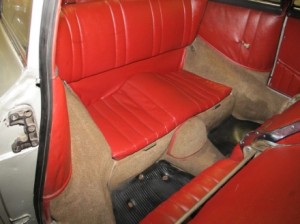 wheel. Cleaning these items with a petroleum or alcohol based cleaner may cause distortion and discoloration. So, be very careful when choosing a cleaning solution for these rare and hard-to-find pieces. Under the backseat, you will notice twin storage compartments. This is a unique feature, not typically found in American cars; it is just a perfect example of distinctive European automobile design.
The Exterior
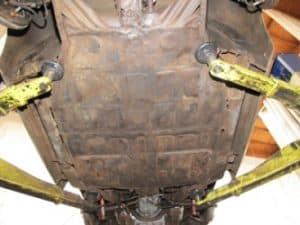
Obviously, the presence of severe rust can also be troublesome. Surface rust is of no consequence, but purchasing vehicles with deep rust, which has destroyed significant sheet metal and possibly damaged the structural integrity of the chassis, should be avoided. After a careful assessment of the condition of the body is made, you must make the decision to either repair, or replace, damaged sheet metal. As a general rule, I only replace floor panels when the rust has created an opening which is severe enough to create a “sag” in the component. The size of the opening will vary depending upon vehicle model and location of the damage, but typically any opening of greater than one inch in width or four-inches in length could necessitate replacement of the entire panel. Several reputable firms offer quality sheet metal replacement parts, however once these factory components have been replaced, the appearance of the under carriage is never quite the same. That is not to say that it will look worse, afterward; simply different. If your intention is to restore a car and resell it as original, this “different” appearance could detract from the originality of your car, as seen from the eyes of perspective buyers.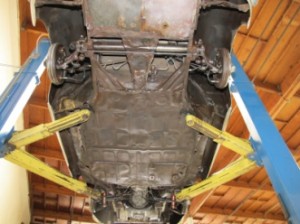 Small openings created by rust can be easily repaired using a fiberglass compound, and once the entire under carriage is undercoated, it will be restored to all of its “original” glory. This particular car, as with most of these Porsche models, had some rust at or near the extreme bottom of the body. Under the deck lid, in the area of the battery box and spare tire storage area, and in several areas of the passenger compartment floor pan, there was evidence of serious rust. So much so, in fact, that the floor of the storage area was in need of replacement, but luckily the passenger floor pan could be reliably repaired.
Sheet Metal Replacement
Under the deck lid, trunk, or boot, and in the extreme lowest portion of the storage compartment where the battery box and spare tire are located, rust and/or corrosion had created a cancerous effect on the floor. When looking downward, one could actually see exterior lighting peering back through tiny holes in the very thin sheet metal flooring. Upon tapping the bottom of the pan with a small hammer, it was discovered that this section of sheet metal would require replacement. Replacement involved cutting the infected area of flooring out, then welding a new section of sheet metal into place. Be sure to cut out the rusted area, in its entirety, and then sand the area to be welded down to the bare metal. New metal cannot be welded to rusted metal; your weld will not adhere properly, if at all. Regarding this particular piece, a drain hole is often a good idea, so that unwanted water may drain away. After the new section was welded in, the welds, seams, and edges were treated with a waterproof filler, then sanded and treated with a coat of primer. The primer would deter rust while the remainder of the under body was prepped for undercoating. Inside, the new sheet metal will receive a coat of primer, and the entire storage compartment will be painted to match. The intent here is to achieve a factory original appearance, while improving the integrity of the body.
Sheet Metal Repair
All affected areas of the passenger compartment floor pan were sanded to remove rust and then treated with a coat of primer. After allowing this prep work to cure, overnight an epoxy resin was used to patch the small openings which remained. Once the epoxy was allowed to dry, it was sanded to match the floor pan and treated with a waterproof filler and a coat of primer. After completion of all sheet metal repair and sanding was realized, the entire under belly of the Porsche was treated to several coats of high-quality undercoating. The wheel openings were also treated, to provide a uniform factory appearance.
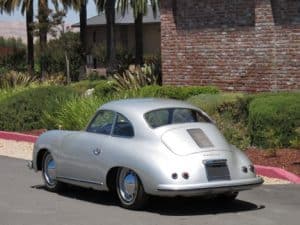 The upper body on this particular Porsche had no signs of visible rust. The exterior trim was carefully removed, and the body was prepped for painting. This involved the use of a minimal amount of body filler and lots of sanding. The sanding began with a digital-orbital sander, concluded with hand held sanding blocks, and went to the bare metal wherever possible to achieve the desired smoothness. When body preparation was completed, a coat of primer was applied and allowed to dry. Several coats of acrylic-enamel paint were applied; the final coat contained a clear coat, to achieve a semi-gloss factory appearance. The paint was allowed to cure for twenty-four-hours and all of the trim was reinstalled.
______________________________________________________________________________________________
 1965 Porsche 356C Karmann Coupe 616/15 1600cc Restoration Guide
 1965 Porsche 356C Karmann Coupe 616/15 1600cc Restoration Guide
I would never say that this Porsche restoration is going to be a dogged one, but I will say that it was, in its original state, rough, rough, rough. Serious neglect and the cruelty of time had taken a serious toll on both the interior and exterior of this Karmann Coupe. Despite the roughshod appearance of the exterior, the sheet metal was relatively straight and rust free. All of the exterior trim items, as sparse as they are, were present and accounted for. Although the interior was tousled, it appeared as though all of the factory components were present. The same was true under the bonnet. A vintage Porsche restoration is infinitely more inclined to meet my fastidious standards, if all of the factory pieces are with the car. When restoring a vehicle which was manufactured over five decades ago, locating certain essential elements for purchase can be virtually impossible if the originals have been misplaced, broken, or thrown away.
The specifics of this particular Porsche restoration are as follows: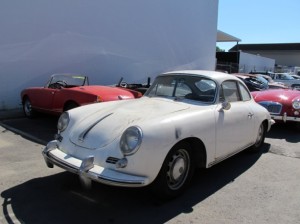
The 1965 Porsche 356C Karmann Coupe is a genuine performance automobile, designed for the driving enthusiast. Therefore, as much consideration must be given to the mechanical aspects of this Porsche restoration as is afforded to the cosmetic aspects. The owner of this vehicle, who will also be referred to as the client, was seeking a thorough restoration. Without revealing financial particulars, I will say that cost was not the primary concern in restoring this vehicle. The client sought an original showroom quality automobile, in appearance and function, and he was more than wiling to pay a premium price to obtain the desired result.
 Steering and Suspension
This particular Porsche restoration would require no “grabbing and shaking” of front tires/wheels, because the client had stipulated that he wanted the entire suspension and steering system to be overhauled. This would necessitate the replacement of all bushings, bearings, shocks, and springs, as well as any hard parts which are subject to friction wear. Control arm bushings, sway bar bushings, and links, inner and outer tie-rod ends, body mounts, and jounce bumpers were replaced and the Porsche was treated to a four-wheel alignment.
 Brakes
The ’65 Karmann Coupe is equipped with a four-wheel disc brake system, which was also in need of repair. Never under estimate the improvement in braking efficiency, which a disc brake system offers, over a drum brake system; it is significant.
Brake rotors, pads, calipers, lines and hoses were inspected and replaced as needed. The ’65 was in need of a maintenance brake job on all four corners, as well as the replacement of both front brake flex hoses. All four rotors showed visible heat cracks, and both the front and rear brake pads were over ninety-percent worn out. The dual piston brake calipers were also rusted, corroded, and in need of a rebuild.
The calipers were removed and the rubber front flex hoses were “pinched” in order to prevent fluid leakage. The calipers were then taken to a proper work bench for further attention. By inserting an air nozzle into the fluid inlet opening, the pistons were “blown” from the caliper housings. The caliper housings and pistons were thoroughly cleaned and dried. New piston o-rings were inserted after being coated with brake fluid, the pistons were carefully reinserted and new dust boots were installed. To reinsert the piston into the caliper, the aid of a large c-clamp may be employed. Lubricating the piston liberally with brake fluid is also a must. Place the edge of the piston into the caliper, then insert the leg of the c-clamp into the center of the lowest point of the piston; now apply slow, steady pressure to the c-clamp while observing the piston as it is inserted. The piston must be inserted evenly; if the piston “cocks” to either side progress will cease. Apply even, steady pressure and push the piston in slowly until it bottoms out. Once the caliper was reassembled, an aerosol spray brake cleaner was used to remove any residual brake fluid from the outsides.
 The disc brake rotors were machined, observing factory recommendations, for smooth brake operation and brake pad longevity. These rotors are not vented and can be challenging to machine, without encountering a “chattering” condition, which can cause a type of checkering, of sorts, on the surface of the rotor. The rotor mounting method, or how the rotor is mounted upon the lathe, will determine how smooth and successful the outcome of the machining process is. Silencer bands, clamps, and springs will also aid in the machining process. The use of an air powered angle die grinder is also helpful in finishing the machining process, by applying a non-directional finish to the surface of the rotor.
While the rotors are removed from the Porsche, both the inner and outer wheel bearings should be carefully inspected. After wiping excess grease from the bearings, observe the shop towel and the grease therein. You are looking for small metallic flakes. If these flakes are observed, then bearing and race replacement will be necessary. If no metallic material is detected in the cloth, then repacking the wheel bearings with axle grease is sufficient.
- Replacing Wheel Bearings/Races
Wheel bearings allow the front rotor to spin freely upon the spindle, without seizing. These bearings are typically of the tapered roller variety, housed in a cage configuration. The race is the cup shaped component which the roller bearing rides in. A thin layer of quality axle grease keeps the bearings turning, and prevents them from seizing inside the races. The races are press fitted, either in the rotor, or hub assembly. To remove the faulty races, use a drift punch or chisel to contact the edge of the race and drive it from the housing, using a hammer. To install the new race, use an aluminum or brass bearing driver, place the race on the edge of the housing and the bearing driver upon it. Using a hammer, carefully drive the race into the housing until it bottoms out. Using your finger coat the surface of the race with a thin coat of grease, pack the new wheel bearings with grease and install the inside wheel bearing into the rotor, then install a new grease seal. Slide the rotor onto the spindle and insert the new outer wheel bearing into the rotor, install the thrust washer, castle nut, cotter pin, and grease cup, where applicable.
- Repacking Wheel Bearings
To repack wheel bearings, without the aid of a specialized bearing packer, simply grab a fist full of axle bearing grease, in one hand. With the opposite hand, grasp the bearing, placing your index and middle fingers through the center. Using the larger end of the bearing opening, force the bearing into the grease in a downward motion; continue to do so until grease is emitted from the opposite end of the bearing. Once this section is packed, work the bearing around your fingers towards the next section until the circle is completed.
With the rotors, calipers, and new front brake pads installed, it is time for replacement of the front flex hoses. Unscrewing the flex hose from the steel line may involve the removal of a retainer clip, and will certainly require the use of two wrenches. Be very careful not to damage the hexagonal shaped line-nuts on either of these lines, when loosening. Make sure that you securely tighten the line fittings on the new flex hoses, as they will be required to transport brake fluid at extremely high pressure. Always reinstall the retainer clip; failure to do so could result in a cut brake line and lead to a loss of vehicle control. Now, bleed the brakes; starting at the caliper which is farthest from the master cylinder, and working towards it. Once the brakes are sufficiently bled, use aerosol spray brake parts cleaner to remove excess brake fluid. The brakes should be safe, quiet, and smooth.
Mechanical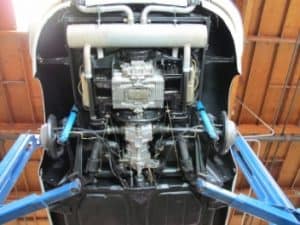
The 1600cc engine in the ’65 was in working order, and only required a “freshening-up”. The engine and transmission were removed and placed into the hydra-vat, for an extreme cleaning.
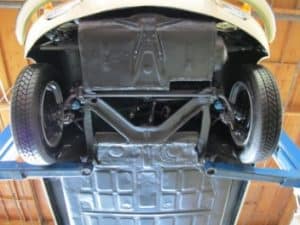
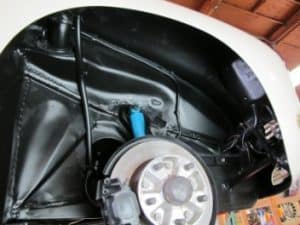
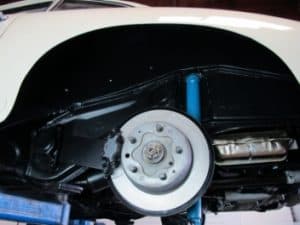
With the engine and transmission removed, all rear suspension items, as well as the undercarriage, were pressure washed and treated to several coats of high-temp paint/undercoating in order to obtain a showroom appearance. All four wheel well openings, as well as the entire under belly of the Porsche, was treated to several coats of high temp black paint.
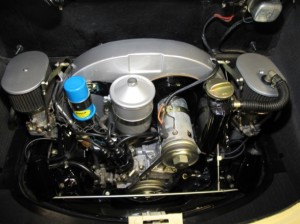 The engine received new rings, bearings, seals, and gaskets and the cylinder heads were performance tuned. The valve seats were reground to factory specifications and new guides, springs, and seals were installed; combustion chambers were ported and polished for increased performance, as well. The twin Weber carburetors were vatted and rebuilt using new floats and needle valves, then reset to factory specifications. Engine components were painted, where applicable, to achieve a factory fresh appearance and the exhaust manifold was powder coated for a great look, that will last for a long while. The engine and transmission were reinstalled with a new high-performance clutch, pressure plate, and throw-out-bearing. Belts, filters, and fluids were replaced according to factory specifications, and a cold valve adjustment was performed. Maintenance tune-up items replaced included: spark plugs, fuel filters, distributor cap, rotor button, spark plug wires, and air filters. The fuel tank was drained and inspected for rust and debris, and new fuel lines were installed. The fuel tank was filled and the tank, lines, pump, and carbs were checked for leaks. The very last thing that you want to overlook, when restoring a valuable Porsche for a loyal client, is a flammable fuel leak. All vehicle wiring connectors were inspected, and wiring harnesses were rerouted and repaired wherever necessary. An updated fuse panel was installed in the boot, complete with an explicatory cover and a top-of-the-line battery was also installed.
The interior of the boot, battery box, and spare tire compartment received a thorough cleaning, as well as several coats of primer and black paint; this would help to achieve the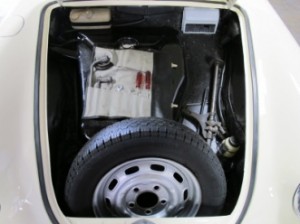 showroom appearance. Also, note the presence of the factory tool kit, tool bag, and bumper jack with the tire iron, in the boot. Seemingly insignificant details, like this make up the difference between good cars and great cars.
The engine was started, the timing was set, and a final valve adjustment was made. The clutch was also adjusted at this time. The engine looked and ran great, and the extra effort in painting and cosmetic work really paid off in the under carriage area, as well. The ’65 looked as though it had recently rolled off the assembly line, in Germany.
The Interior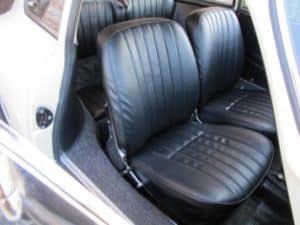
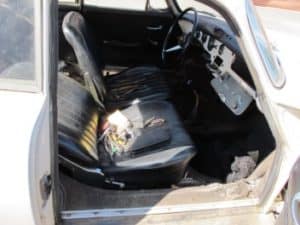
Possibly the most denigrated area of this project is the interior. The seating, dash pad, and carpet were all torn asunder and the glove box was a wreck, but it seemed as though all of the parts were there. The seat covers, in the front were torn and large portions of the padding were damaged. The rear seating was also torn and the elements had taken their toll on the carpeting. The dash pad was suffering from sun shock and was badly split. Someone had removed the radio from the dash, using very little expertise, and the glove box door was distorted to the point that it had become inoperable.
 The seating was removed and the seat covers and original padding were removed and discarded, along with the refuse of many years which was in the floor boards and cargo area. New seat covers were sewn for the front and rear seat sections, door panels, and the dash using a leatherette material which closely resembles the original factory seating surfaces. The seat covers were expertly sewn by an upholstery specialist to duplicate the factory seating. All seams and piping were sewn into the seat covers. The upholstery shop also sewed the upholstery section in the cargo area, door panels, and the dash covering. Blocks of padding were cut and formed to replace the factory padding and glued to the seat frames. After that it was just a matter of pulling the covers, which fit very tightly, over the padding and frames, then using upholstery eyelets to secure them. The seats, door panels, dash, and cargo panels turned out great, I was very pleased with the results.
We purchased a new factory replacement carpet kit, which was very well made, and installed it in just a couple of hours. With the fresh, new carpet in place the seating and door panels were reinstalled. New hardware was used to replace the rusty hardware in the door panels.
 The glove box door was straightened using old fashioned elbow grease and the radio was thoroughly cleaned, to achieve a showroom appearance. The factory radio turned out to be a total loss. Instead of installing an aftermarket CD player/radio into the dash, we left the factory radio for the cosmetic effect. Mounted inside the roomy glove box is a modern CD player with AM/FM and satellite radio. This makes it possible to find just the right “driving music” regardless of where you are, while retaining the factory appearance.
A word of caution: A hidden “kill switch” may help you to protect your vintage automobile from theft. By using a heavy-duty, single throw toggle switch, and mounting it in a hidden location, you can add a fool proof security measure to any restoration project. I have a few loyal clients who look forward to playing automobile “hide-and-seek”, when they take delivery of their precious auto. They get inside and attempt to locate the hidden security device, which must be within reach of the driver as he sits in the cockpit. If they can successfully locate the device, they win $100 off the next purchase. To date, I have never had to pay.
The Exterior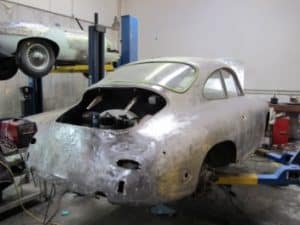
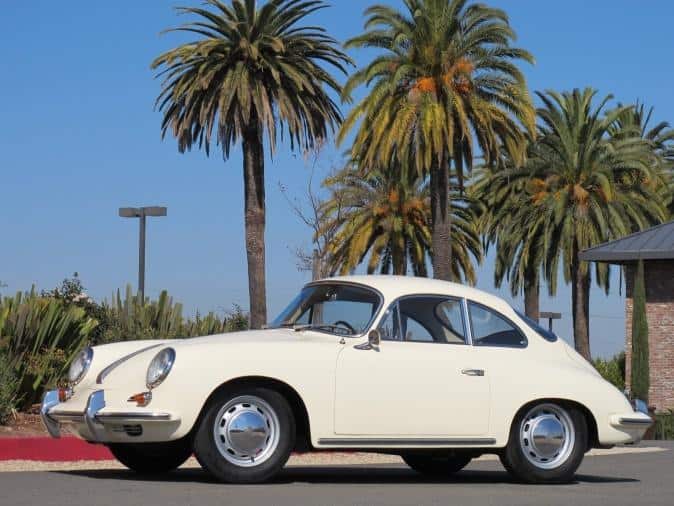
The exterior of the ’65 Karmann Coupe was white and faded, with the usual cuts, scrapes, and bruises. As any reputable restoration specialist will tell you, the only means of achieving a factory finish is by taking off all of the old paint, and getting to the bare metal underneath. All of the exterior trim and moldings, as well as bumpers and mirrors, were painstakingly removed, the vehicle was masked using quality tape and masking paper, and sanding through the paint to the fresh metal was undertaken. 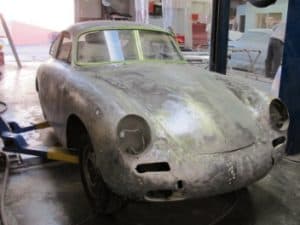 An air powered digital-orbital sander was used to remove the gross majority of the old paint; hand-held sanding blocks were used to remove the remainder. After that, several minor imperfections were repaired using a minimal amount of body filler, and several good coats of primer were applied. The primer was allowed to dry, for several days, and the entire Porsche was sanded until an extremely smooth surface was presented for painting. The original, black Karmann door tag indicates that the factory color was Light Ivory, so steps were taken to acquire this shade in acrylic enamel, along with a durable clear coat. Several coats of paint were applied, along with the clear coat, and allowed to cure for seventy-two-hours. All of the exterior trim, moldings, bumpers, and mirrors were meticulously reinstalled, after being machine polished to a bright finish. The paint color turned out beautiful, and the Porsche looked like a million dollars, as it drank in the California sun.